Sound Design
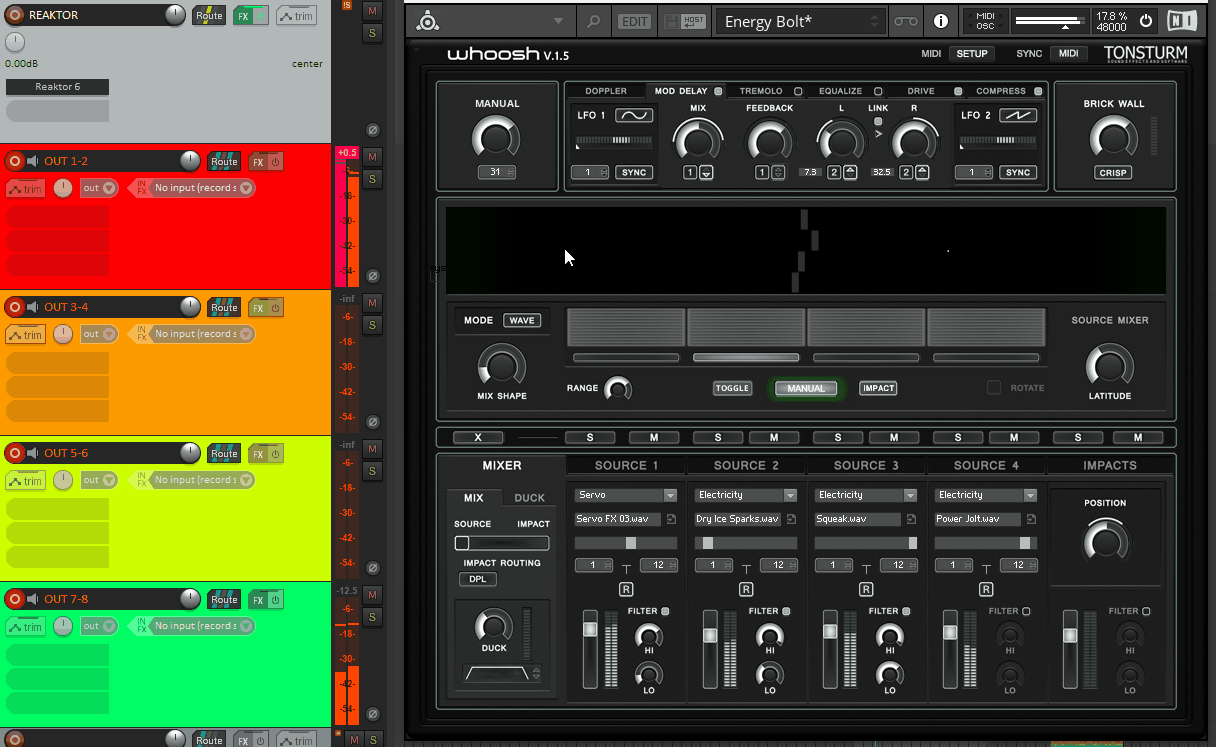
Multichannel Whoosh Output Setup
Tonsturm’s “Whoosh” plugin/ensemble is a pretty amazing tool that I’m sure most sound design folks know well by now.
Carlye Nyte put together a great resource a while back that showed how to modify Whoosh so that you could route audio into it in real time.
Link Here
Last week I had a challenge where I was working on some content that was perfect for designing in Whoosh, but I wanted to keep certain layers isolated for customization later in game.
So I wanted to see if you could split it’s output and get each of the 4 “source” layers out to a dedicate track.
The short answer, yes you can. I put together a short tutorial on how to do that here: Video Link
But if you want some more thorough steps, I’ve outlined them here.
There are a few things to note about doing this
Do a “Save As…” of the Whoosh ensemble before starting, so you don’t modify the standard instance of Whoosh.
Take your hand off the keyboard to avoid hitting “undo”. The undo action is still tied to your DAW, so if you hit that while messing around in Reaktor’s Core interface, you’ll just remove Reaktor along with your work.
…not that I did that
….several timesMultichannel output means we’re taking the signals before they are summed, which means the stereo effects (doppler, delay, limting, etc.) inside of Whoosh will not have an affect on these outputs.
Alright, steps to add multichannel output in Whoosh.
Add an instance of Reaktor to a track and open the Whoosh ensemble (do your “Save As…” here)
Press the Edit button at the top and then in the “Panel” bar that appears click “WHOOSH”

In order to expose the multichannel output from Whoosh, we need to find where those signals are summed. Lets go digging…
3. Double-click the “Source+Mix” node.
4. Double-click the “Mix” node
5. Double-click the “Grain Mixes” node
6. Double-click the “0 Wave” node - Special note here, by doing this modification to just this node it means you will only get this functionality in wave mode. If you want this to work in random (or both) you’ll need to duplicate these efforts in that node as well.
7. Double-click the “WaveScan” node
8. Double-click the “core” node
9. Double-click the “Core Cell” node
Finally we have arrive at the location where the summing of the 4 voices happens inside of Whoosh.
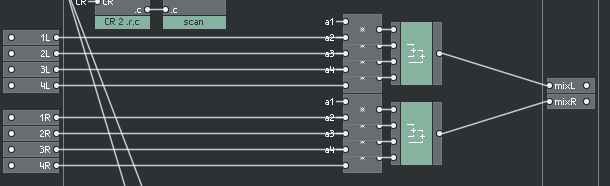
You should see something resembling the image above. On the left you can see the inputs labelled L/R and for the 4 source inputs. On the right these are output to just “mixL” and “mixR”.
We want to make some more outputs of our own. Resembling the image below.
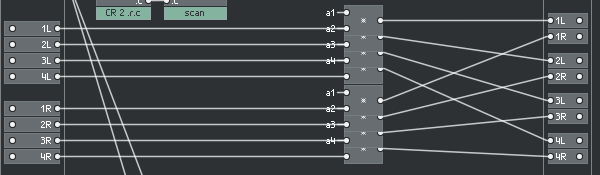
Right clicking in the thin rectangle on the far right will bring up a contextual drop down, You’ll want to select New > Out.
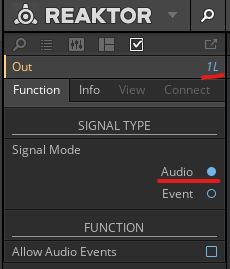
Each new output by default will be an “Event” output. Right-click the new output and select “Properties”. You should see a column on the left hand side of reaktor appear like this image.
Change the Signal Type to “Audio” and I also HIGHLY recommend naming each output here too. In the top right you can see this is the first channels left output “1L”.
Repeat this for the other 7 output needed for our 4 stereo channels until you have a setup resembling the above image.
It’s important to note that the order of those output nodes on the right hand side will dictate their output order when we look at this node from a higher level. So if you want your outputs to be arranged 1L, 1R, 2L, 2R, etc. then arrange them accordingly.
Once you’ve added those outputs and arranged them appropriately, we’ll need to “back out” of this node to a higher level to see those exposed outputs.
Currently we’re in the “Core Cell” node, but you can see on the top panel row the nested path we’re currently in.


Click on the “core” tab to go back up one layer and we can see the outputs we’ve exposed.
On the right you can see that the “Core Cell” node now has the outputs we created (“1L, 1R, etc.”), so we’ll basically need to repeat this step for all of the nested nodes until we expose this audio to the top level where it can be output from Whoosh itself.
In this image on the right you can see that I’ve removed the outputs that were connected to 1-4. For the most part, this should be fine, but be careful not to delete and additional functionality of Whoosh.

To get these additional outputs Right-click on the background of core view and select; Built-In Module > Terminal > Out Port.
Duplicate the output 7 more times, and then hook up those outputs to the outputs you just created from the “Core Cell” node.
This will now have exposed 8 new outputs from the “core” node, you can then repeat the steps of adding 8 outputs and hooking them up for each level. core, WaveScan, 0 Wave, Grain Mixes, Mix, and Source+Mix.
It’s a bit of a process (remember not to hit undo at any point!) but luckily it shouldn’t be difficult, just a bit time consuming and repetitive.
Right-clicking, “Copy” and “Duplicate” will help things move a bit faster. If you’re doing this, you’ll probably notice when you hit the top level you won’t be able to paste the “Out Ports” from the previous level.
At the “Whoosh” level, you’ll need to go back to the right-click menu and select “Out Port” again, there’s some conversion error that prevents copying and pasting here.
So if you see the image below, just right-click on the background and select Built-In Module > Terminal > Out Port. (Yes, even though that’s the same apparent object as before).

Once you’ve finished, your “Whoosh” layer in core should resemble the image below. With 8 new outputs exposed from the “Source+Mix” node.

At this point you can now route the output of the track Whoosh is on to 4 stereo tracks and use Whoosh as normal. Again, this bypasses the doppler engine, effects plugins, and some other functionality. But it will give you the volume, randomization, and other playback engine functions of Whoosh as separated layers.
Hopefully someone found this useful, enjoy!
